[ad_1]
Last Edited:
This page is part of IGN’s Monster Hunter Wiki guide and details a comprehensive list of tips and tricks that will help not only beginners, but also many returning veterans of the Monster Hunter series.
Whether you’re looking for general quick tips, crafting and buddy related tips, or even combat, armor, and weapon based tips, we have you covered in our detailed Tips and Tricks page below. Got a tip that you think we should add? Let us know in the comments below!
Looking for a specific tip or trick? Click the link below to jump to…
Quick Tips and Tricks
- Village Quests can only be done solo, Gathering Hub is for multiplayer – so they’re a bit harder!
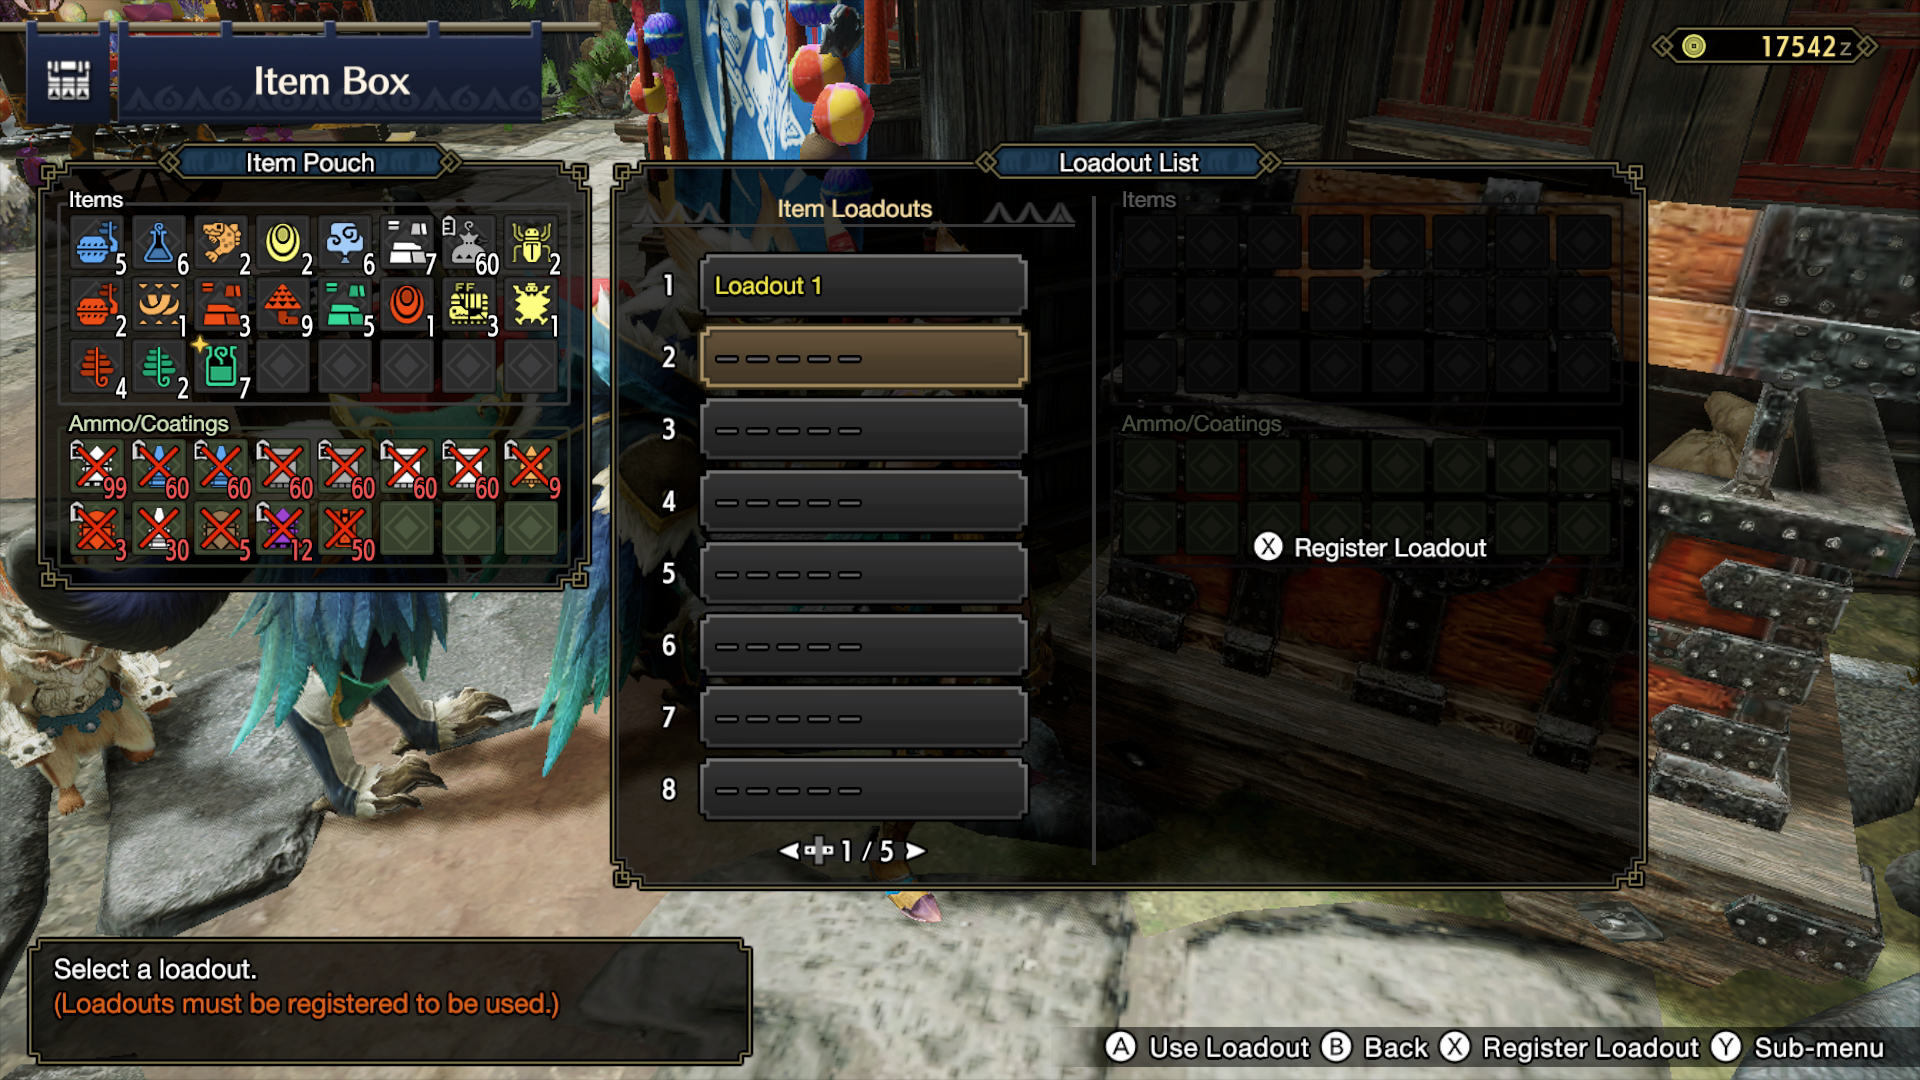
- Make Item Loadouts so you don’t have to manage your inventory every time in between quests. Item box – Manage items, transfer item tabs to get perfect loadout and then create an item loadouts.
- Configure your radial menu to use items fast!
- The hunter’s notes weapon tutorials basically need to be read to understand a weapon, just pressing buttons at random without knowing the combos / flow of a weapon won’t be very efficient (and it’s super hard to pick up on naturally).
- Make sure to always have the optional subquests selected to build up kamura points and armor spheres.
- There’s a Cahoot nest up a tree in the Buddy Plaza – check it to find free stuff like Steel Eggs, Lagia Apples, and Trap Tools.
- Take advantage of endemic life!
- It’s totally normal to take a little while on your hunts, especially if you’re exploring and collecting on the way! Taking ten minutes or more is normal for solo Village Quests.
- Stock up on items when they’re on sale, like trap tools and bombs.
- There’s no fall damage! So if you’re in need of getting somewhere below you quickly, simply jump straight off the edge, and you’ll land safely without taking any damage – the same goes for your buddies!
- Once you’ve completed a quest and entered the rewards screen, you can collect your quest rewards by pressing and holding A to take all of your loot quickly. This is a quick and easy alternative to scrolling down and pressing Take All.
- As you progress through the game, it’ll quickly get tiresome having to travel to your main camp constantly. Thankfully, while exploring the region, you may be lucky enough to stumble across a sub-camp location. These are often relatively well hidden, and while they may not be usable straight up, they can become handy as not only can you fast travel to them, but you can also eat, change equipment, and use the Buddy Board. Unfortunately, you won’t have access to supply boxes, and items cannot be delivered for delivery quests. You can learn more on how to find and unlock each of the different region’s sub-camps here.
- Once your Village Quest level is four stars or higher, you’ll receive what is known as Special License Tests. Upon completing these quests, you will increase your Gathering Hub Quest level by 1 rank. So if you’re looking to bypass some of the earlier star levels, try waiting for these Special License Tests to appear.
- Constantly refer to your Hunter Notes as it will be continually updated as you progress throughout the game and defeat more monsters. Hunter Notes will detail everything you need to know about a monster, whether it be their characteristics, known habitats, threat level, weaknesses, statistics, ailment effectiveness, and even the percentage chance of receiving each of the materials that they drop. Hunter Notes should essentially be treated as your monster bible – it’s really that helpful, trust us.
- Forgot to eat before heading out on a quest? Use the tent at your base camp to cook up your favorite Dango.
- Low on supplies such as traps, bombs, and potions? Remember to always restock your inventory at the Item Box before heading out on a Quest.
- Let’s face it, getting the hang of the combat in Monster Hunter Rise can be a little challenging, so why not utilize the handy lock-on feature that can make attacking monsters just that much easier. There are two ways that you can lock onto monsters; firstly, you can use the default Target Camera option, which can be activated by simply pressing the right stick and selecting the monster you want to lock onto in the top left corner and then pressing L. This will allow your camera to turn in the direction of the monster automatically.
- Next, we have the Focus Camera, which can be activated by pressing the + button and heading to the Options menu. From here, head down to the Camera settings and then change your Camera Style to Focus Camera. The Focus Camera is an excellent option for any beginner, as not only will your camera turn in the direction of the monster you’re focusing but your reticle will also always stay on the monster. While it may take a little getting used to, definitely consider trying out the two different camera options to find what works best for you and your playing style.
- When the time comes, don’t forget to claim your free Great Wirebugs from the Senior Hunter Hanenaga – he can be found just in front of the bridge that leads to the Buddy Plaza. Don’t go using them all at once though as they are limited and in order to get more you’ll need to complete several quests, so use them sparingly.
- Upon arriving in the area of your new quest, be sure to always collect any items that are available from your Supply Box. There will usually be a handful of free healing potions and other helpful items that’ll help you on your hunt. If you’re playing with others, just remember to not be greedy and to keep some stacks of items for others as the box is shared.
- When using the menu system, press Y to bring up a detailed look at your map. Here you will find several options that allow you to zoom in and out of specific areas, fast travel to your Main Camp, and even search for specific items/materials. To bring up the complete Icon List, simply press X and you’ll be able to search the map for every available item. This is a fantastic way to narrow down the exact location of certain items that you’re looking to collect such as Materials, Endemic Life, and even Hunting Helpers.
- Your Item Pouch is limited on space, so remember to transfer any unwanted items that you have managed to collect to your Item Box. Before defeating your required monster, make sure you have some spaces free in your Item Pouch, as you will only have a short period of time to carve for materials before you are transported back to the village. So don’t go wasting this time emptying your pouch as you may miss out on collecting some valuable materials.
- Unless you’re quick at defeating your monster, the effects of your food will eventually wear off over time or should you happen to faint. If this is the case, you can grab another meal by heading to your Base Camp.
Crafting and Gathering Tips and Tricks
- If you’re looking for a particular item to gather, you can sort through everything while looking at your detailed map, and see exactly where everything is.
- Collect random stuff like plants, mushrooms, bugs, and mining spots as often as possible. Basically, every time you pass and it’s easy to just press the A button, just do it. Trust me you’ll need it .
- Also hire new Buddies and keep them trained up at the Dojo! Switch them out with your Meowcenary and Argosy helpers – the higher their levels, the better they’ll do.
- Some items are exclusive, or at least much more common, in different locales
- Once you’ve slain a monster, you’ll have the opportunity to carve materials from them – carving materials is a must-do activity if you’re looking to upgrade weapons, armor, and even more.
- Looking to explore or simply gather materials? Try out Expedition Tours! These quests allow you to freely explore a region without a time limit. As you start exploring a region, you’ll even begin to encounter small monster outbreaks and surges in resources. More information on the different regions within the game can be found here or by checking the in-game Quest Info or Quest Board.
- Looking for a specific resource? Open your world map and view the detailed map for tons more information.
- Keep in mind that all items, materials, and Endemic Life will respawn overtime in the same location in which you had found them.
- Don’t be afraid to collect absolutely everything! There’s no disadvantage to collecting items as you travel by them on the go and let’s face it, you never know when you’re going to need some extra supplies.
Buddy Tips and Tricks
- Please consistently use the Meowcenaries and the Argosy for exclusive materials you can use to make super unique awesome armor and buddy armor – like Halloween Armor, Magical Girl Palico, and Pegasus Palamute.
- The Argosy’s rare finds are occasionally sold for 10k + (after 5 star quests are unlocked)
- Don’t forget to frequently check in at the Buddy Board, which can be found near the Village center. Here you will be able to manage your Buddies and even equip several helpful skills. As you level up your Buddies, new tiers and skills will unlock so it’s important that you remember to check these skills quite frequently to ensure your Buddy is always up to date.
- Tired of having to wait so long to mount your Palamute? Head to the Options menu in the settings and select Controls. Here you will find a setting called “Button Hold Settings”. Upon changing this setting, you’ll either increase or decrease the time in which it takes to mount your Palmute and skip cutscenes.
- Reward your Palamute and Palico with some attention when using the wait command on them. Upon using the command, you’ll now have the option to pet, play, shake, high five, or even give them a treat.
Combat and Armor Tips and Tricks
- Don’t use your armor spheres to upgrade the basic armor. Save them until you have a piece with a skill you *really* like that’s uncommon. Like Kulu-Ya-Ku’s chest piece with Horn Maestro – you won’t find this skill again for quite a while.
- Having trouble? See what weapons or armor you can upgrade to. Do some extra hunting to get it if needed. Once you’ve got the required materials, visit Smithy to begin the upgrading process.
- Is there a limited time-only Dango available now you really like? Save it to a “Usual Order” set and you can get it whenever you want!
- Keep in mind that when trying to eat, you’ll need to have sheathed your weapon. This can be done by pressing Y but, depending on your weapon, sheathing it isn’t always instant, so definitely take this into account when you’re in the middle of a heated fight. There is an exception, though, as the Sword and Shield can be held while consuming your healing potions.
- Notice those bright yellow numbers that pop up when you’re attacking a monster? These indicate a monster’s weak point! You’ll want to make sure that you’re targeting these areas for the most damage.
- As you attack monsters your weapon will lose sharpness over time! That’s why it’s important to set up your radial wheel with a Whetstone for quick access. Using a Whetstone will help restore your weapon’s sharpness and ultimately prevent your attacks from bouncing off the monster’s hide.
- It’s okay to mix and match armor! Don’t feel like you’re stuck wearing just one particular type, as you’ll want to mix different pieces together to help find a combo that matches your playstyle.
- While it’s okay to mix and match armor, do keep in mind that some sets do offer a Set Resistance Bonus once you’ve equipped more than 3 pieces of a set.
- Want to practice your skills or even try out a brand new weapon? Don’t be afraid to head to the Training Area, which can be accessed via the Buddy Plaza. Speaking from a complete beginners perspective, the Training Area significantly helped me understand the combat system in Monster Hunter Rise as well as how to properly utilize each weapon to their full potential. You can even adjust some of the facilities in the Training Area by speaking with Sekirei the Trainer or simply head to the Training Options in the Start Menu. There’s also no need to worry about using up ammunition or coatings as they won’t be used up while training in the area.
- Monster Hunter’s combat system is all about making good, strategically timed attacks. If you opt for a more button mashing approach, it’ll be easy to mistime attacks and ultimately take unnecessary damage that could have been prevented.
- Try studying the monster’s different attacks and movements; this will help you better judge and prepare your attacks accordingly. Don’t be afraid to spend a few moments circling the monster as you learn its attack pattern and any key movements that you can take advantage of, such as dodging in a particular direction to avoid a monster’s swinging tail.
- Listen for your Hunter’s callouts as they’ll often let you know if a monster is about to perform a strong and powerful attack.
- With up to 14 different weapons to select, you’re probably wondering just which ones are the best to use? Well there aren’t really any bad weapons to use in Monster Hunter Rise, as your weapon choice ultimately comes down to your preferred playing style. While we do recommend both the Dual Blades and the Sword & Shield as great starter weapons, there really is no right or wrong weapon to select. So don’t forget to check out our Best Weapons and Armor guide to see which weapons will work best for you and your playstyle.
- Need a bit of a breather? Dung Bombs are known to be particularly odorous and will often cause monsters to flee to another area in the map.
- While it may seem fairly obvious, don’t go spending too much time grinding materials for low-tier armor. More often than not, the low-tier armor will quickly become outdated, especially as you begin to unlock more Key Village Quests at Star Level 2 and above.
[ad_2]